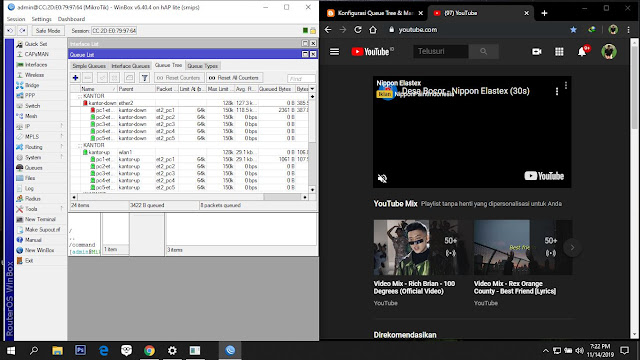
Queue Tree
Queue Tree adalah salah satu fitur yang terdapat dalam mikrotik yang digunakan untuk mengatur jumlah bandwidth. Berfungsi untuk mengimplementasikan fungsi yang lebih komplex dalam limit bandwidth. Biasanya digunakan oleh admin warnet untuk membatasi satu arah koneksi untuk download maupun untuk upload.
Queue Tree dirancang untuk menjalankan tugas yang lebih kompleks dan kita butuh pemahaman yang bagus teentang aliran trafik dan kita harus mengaktifkan fitur mangle pada firewall. Sedangkan Simple Queue kebanyakan digunakan untuk memudahkan konfigurasi.
Keunggulan Queue Tree
– Lebih Flexsibel dan harus paham tentang mangle dan traffic control
– Mampu membagi bandwidth secara fixed
– Mendukung penggunaan PCQ sehingga dapat membagi bandwith secara merata
– Mengatur aliran paket satu arah
– Jarang orang yang memakai ini
Mangle
Mangle pada mikrotik merupakan suatu cara untuk menandai paket data dan koneksi tertentu yang dapat diterapkan pada fitur mikrotik lainnya, sepeti pada routes, pemisahan bandwidth pada queues, NAT dan filter rules. Tanda mangle yang ada pada router mikrotik hanya bisa digunakan pada router itu sendiri. Dan yang perlu diingat bahwa proses pembacaan rule mangle ini dilakukan dari urutan pertama ke bawah.
Selanjutnya Adalah Konfigurasi dengan topologi berikut :
Berikut Script Konfigurasi Mangle Connect :
WARNET/ETH1
mangle mark connect :
/ip firewall mangle add action=mark-connection chain=prerouting disabled=no new-connection-mark=eth1_pc1 passthrough=yes src-address=200.100.10.2
/ip firewall mangle add action=mark-connection chain=prerouting disabled=no new-connection-mark=eth1_pc2 passthrough=yes src-address= 200.100.10.3
/ip firewall mangle add action=mark-connection chain=prerouting disabled=no new-connection-mark=eth1_pc3 passthrough=yes src-address= 200.100.10.4
/ip firewall mangle add action=mark-connection chain=prerouting disabled=no new-connection-mark=eth1_pc4 passthrough=yes src-address= 200.100.10.5
/ip firewall mangle add action=mark-connection chain=prerouting disabled=no new-connection-mark=eth1_pc5 passthrough=yes src-address= 200.100.10.6
KANTOR/ETH2
mangle mark connect :
/ip firewall mangle add action=mark-connection chain=prerouting disabled=no new-connection-mark=eth2_pc1 passthrough=yes src-address=200.100.11.2
/ip firewall mangle add action=mark-connection chain=prerouting disabled=no new-connection-mark=eth2_pc2 passthrough=yes src-address= 200.100.11.3
/ip firewall mangle add action=mark-connection chain=prerouting disabled=no new-connection-mark=eth2_pc3 passthrough=yes src-address= 200.100.11.4
/ip firewall mangle add action=mark-connection chain=prerouting disabled=no new-connection-mark=eth2_pc4 passthrough=yes src-address= 200.100.11.5
/ip firewall mangle add action=mark-connection chain=prerouting disabled=no new-connection-mark=eth2_pc5 passthrough=yes src-address= 200.100.11.6
Berikut Script Konfigurasi Mangle Mark Packet :
WARNET/ETH1
mangle mark paket :
/ip firewall mangle add action=mark-packet chain=prerouting connection-mark=eth1_pc1 disabled=no new-packet-mark=et1_pc1 passthrough=yes
/ip firewall mangle add action=mark-packet chain=prerouting connection-mark=eth1_pc2 disabled=no new-packet-mark=et1_pc2 passthrough=yes
/ip firewall mangle add action=mark-packet chain=prerouting connection-mark=eth1_pc3 disabled=no new-packet-mark=et1_pc3 passthrough=yes
/ip firewall mangle add action=mark-packet chain=prerouting connection-mark=eth1_pc4 disabled=no new-packet-mark=et1_pc4 passthrough=yes
/ip firewall mangle add action=mark-packet chain=prerouting connection-mark=eth1_pc5 disabled=no new-packet-mark=et1_pc5 passthrough=yes
KANTOR/ETH2
mangle mark paket :
/ip firewall mangle add action=mark-packet chain=prerouting connection-mark=eth2_pc1 disabled=no new-packet-mark=et2_pc1 passthrough=yes
/ip firewall mangle add action=mark-packet chain=prerouting connection-mark=eth2_pc2 disabled=no new-packet-mark=et2_pc2 passthrough=yes
/ip firewall mangle add action=mark-packet chain=prerouting connection-mark=eth2_pc3 disabled=no new-packet-mark=et2_pc3 passthrough=yes
/ip firewall mangle add action=mark-packet chain=prerouting connection-mark=eth2_pc4 disabled=no new-packet-mark=et2_pc4 passthrough=yes
/ip firewall mangle add action=mark-packet chain=prerouting connection-mark=eth2_pc5 disabled=no new-packet-mark=et2_pc5 passthrough=yes
WARNET/ETH1
/queue tree add max-limit=128k name=warnet-down parent=ether1 priority=8
/queue tree add max-limit=128k name=warnet-up parent=wlan1 priority=8
KANTOR/ETH2
/queue tree add max-limit=128k name=kantor-down parent=ether2 priority=8
/queue tree add max-limit=128k name=kantor-up parent=wlan1 priority=8
Berikut Script Konfigurasi Queue Tree Satuan :
WARNET/ETH1
UPLOAD
/queue tree add limit-at=64k max-limit=128k name=pc1-up packet-mark=et1_pc1 parent=warnet-up
/queue tree add limit-at=64k max-limit=128k name=pc2-up packet-mark=et1_pc2 parent=warnet-up
/queue tree add limit-at=64k max-limit=128k name=pc3-up packet-mark=et1_pc3 parent=warnet-up
/queue tree add limit-at=64k max-limit=128k name=pc4-up packet-mark=et1_pc4 parent=warnet-up
/queue tree add limit-at=64k max-limit=128k name=pc5-up packet-mark=et1_pc5 parent=warnet-up
DOWNLOAD
/queue tree add limit-at=64k max-limit=128k name=pc1-down packet-mark=et1_pc1 parent=warnet-down
/queue tree add limit-at=64k max-limit=128k name=pc2-down packet-mark=et1_pc2 parent=warnet-down
/queue tree add limit-at=64k max-limit=128k name=pc3-down packet-mark=et1_pc3 parent=warnet-down
/queue tree add limit-at=64k max-limit=128k name=pc3-down packet-mark=et1_pc3 parent=warnet-down
/queue tree add limit-at=64k max-limit=128k name=pc4-down packet-mark=et1_pc4 parent=warnet-down
/queue tree add limit-at=64k max-limit=128k name=pc5-down packet-mark=et1_pc5 parent=warnet-down
KANTOR/ETH2
UPLOAD
/queue tree add limit-at=64k max-limit=150k name=pc1-2-up packet-mark=et2_pc1 parent=kantor-up
/queue tree add limit-at=64k max-limit=150k name=pc2-2-up packet-mark=et2_pc2 parent=kantor-up
/queue tree add limit-at=64k max-limit=150k name=pc3-2-up packet-mark=et2_pc3 parent=kantor-up
/queue tree add limit-at=64k max-limit=150k name=pc4-2-up packet-mark=et2_pc4 parent=kantor-up
/queue tree add limit-at=64k max-limit=150k name=pc5-2-up packet-mark=et2_pc5 parent=kantor-up
DOWNLOAD
/queue tree add limit-at=64k max-limit=150k name=pc1-2-down packet-mark=et2_pc1 parent=kantor-down
/queue tree add limit-at=64k max-limit=150k name=pc2-2-down packet-mark=et2_pc2 parent=kantor-down
/queue tree add limit-at=64k max-limit=150k name=pc3-2-down packet-mark=et2_pc3 parent=kantor-down
/queue tree add limit-at=64k max-limit=150k name=pc4-2-down packet-mark=et2_pc4 parent=kantor-down
/queue tree add limit-at=64k max-limit=150k name=pc5-2-down packet-mark=et2_pc5 parent=kantor-down
Cara uji coba dengan memberi ip static pada pc dan coba untuk membuka www.youtube.com
WARNET(ETH 1)
1. 200.100.10.2
2. 200.100.10.3
3. 200.100.10.4
4. 200.100.10.5
5. 200.100.10.6
KANTOR(ETH 2)
1.200.100.11.2
2.200.100.11.3
3.200.100.11.4
4.200.100.11.5
5. 200.100.11.6


